I've been saving selvages in 2 plastic Animal Cracker jars for several years now. The jars are packed full so when I fell hard for this quilt by Jodi on Pleasant Home blog, I knew just what I wanted to make with my precious selvages. (In case you wonder, I try to add at least one inch of "color" when I cut off my selvage from the yardage.Some are less. Some are more.)
Because i figure that you might like to make some of these easy-to-do blocks, I thought that I'd show you how I'm making mine. First, dump out all of your selvages into a basket or other large container that you can rummage through.
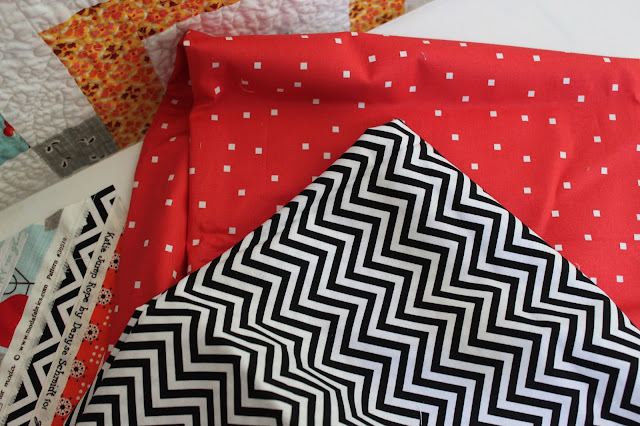
Pick a fabric to use for the center strip on each block. This fabric will create an on-point frame around each diamond shape once the blocks are set together. Cut the fabric into 1.5 inch strips. (A yard should be enough to make a lap size quilt.) I almost chose the red dot, but ended up using the black and white chevron below.
This is a foundation pieced block. I am using premium musiin, cut into 6.5 inch squares for the foundation. You could also use paper if you don't mind ripping it off after stitching. Center the one inch strip on the diagonal of a foundation. Cut the strip so that it extends over the end of the foundation square a bit. Pin if necessary.
Now for the fun part: Pick out some selvage fabrics with the lots of writing or dots to lay next to the center strip.Cover the center strip on each side with the selvage leaving a half inch of the strip showing. Trim the selvage so that it extends past the muslin on each corner. I usually pin this first strip to keep it straight. Stitch close to the edge of the selvage. (You might want to stitch again on the other side of the writing if the selvage is one with a frayed edge.)
Continue to lay selvages on either side of the middle diagonal fabric strip and sewing as described above until the muslin is completely covered. Now,flip the block over and trim it to the muslin size using a rotary cutter and square ruler. (Note:Your foundation might have "shrunk" a bit from the stitching so be sure that you are cutting the block to the desired size. In my case, that is 6.5 inches.It is okay for the selvages to extend beyond the foundation base a little.)
Four blocks sewn together will create the X in the middle. Mine will measure 12 inches finished. I plan to make 30 of these to create a quilt, 60" x 72".
These things are incredibly addictive to make, I'm just telling you now! Have I tempted you?!


What a great project!!!! I absolutely love your choice of the black and white chevron for the center strips. I have been saving selvages, too - and YES! you have certainly tempted me!!!
ReplyDeleteWhat a fun project! It is so happy and bright.
ReplyDeleteThat's the nicest 'oops' I have seen in a LONG time! At first I thought you were 'crackers' to start another quilt! OK, enough with the jokes!! This is fabulous! How dare you tempt me! Oh, that's right , I don't have any selvedges!
ReplyDeleteOooh, I love this! Thanks for the tutorial. I've been saving my selvages but wasn't sure how to go about putting them all together into a quilt. I have awhile yet before I have enough to make a quilt so I'm saving this to refer back to. I can't wait to see your finished quilt!
ReplyDeleteWhat a wonderfully easy way to put this thing together! I've been saving selvages for years now and finally found a great way to make something - thanks! This I can do.
ReplyDeleteActually, yes. I like the way you kept a 1" strip of color. This is the first selvedge quilt that I have seen that done with and the first that has made me consider saving these strips!
ReplyDeleteSuch a fun quilt. The chevron is perfect for the center.
ReplyDeletewhat fun! love that black and white fabric in the middle. perfect!
ReplyDeleteI AM TEMPTED! You see I have a gallon zip lock bag that is stuffed way too tight full of selvages. Yours is beautiful!
ReplyDeleteI loved how you used the black chevron in the middle it makes it look so so cute!! Great job :)
ReplyDeleteYour creativity and resourcefulness have no end! Thank you for this wonderful idea!
ReplyDeleteLove the black and white fabric in the middle. Fun and happy quilt.
ReplyDeleteI've been saving selvages too! And yes I am tempted, not sure I have enough for a whole quilt though! :-)
ReplyDeleteWhat a fabulous idea! So fun how you store your selvages! Beautiful photos!
ReplyDeleteSo, how do you sew your blocks together? Seems like the seams will be very bulky.
ReplyDeleteThis comment has been removed by the author.
DeleteHi Charlotte, Thanks for the great question. I'm sewing the blocks together just as I so any other quilt. A little Best Press seems to keep the pressed open seams nice and neat.
DeleteSuch a cool design, Carla! Love that you picked the black and white chevron for the center - it just pops! Of course, you've tempted me, but must resist, must resist... resist...... succumb.
ReplyDeleteMaybe maybe! I suddenly started collecting selvages this year for no real reason. If I never use them I'll just give them away to someone who'll use them.
ReplyDeleteCarla, yes I am tempted. Like the that black/white chevron. What is the width size of your saved selvage strips? Love your tutorial. This will be addictive, I can see. Thank you for sharing.
ReplyDeleteAnna
It's wonderful! I so thoroughly enjoyed making one four years ago. I joke that it is worth THOUSANDS of dollars bc at $10/yd you need a full yard in most cases to get one good running selvage print and you need a LOT of strips to make a quilt! lol. The black and white center strip in your blocks is genius and I am SO inspired to start another one now (but I pray that I find the strength NOT to bc I can hardly walk in to my studio due to all the ufo's!) Found you on Pinterest...thanks for the inspiration!
ReplyDeleteThis comment has been removed by a blog administrator.
ReplyDeleteThis comment has been removed by a blog administrator.
ReplyDeleteI keep my selvages in the exact same containers! ;-)
ReplyDeleteI love the chevron centers - such perfect cutting of them!
I also like how you start with the finished edges of two of them coming off the center.
Thanks for a great tutorial!
Love! Great tip about cutting selvedges with extra color. Now I want to have my own animal cracker jars full and will be impatient until I have enough to make this quilt.
ReplyDeleteThe more I see of your blog the more I want to see. I like your sense of color and fun!