Tuesday, July 30, 2013

Save the Selvage

Well, it's almost the last day of July and instead of a "finish" to show you, I"m reporting on a new start! Oops!!
I've been saving selvages in 2 plastic Animal Cracker jars for several years now. The jars are packed full so when I fell hard for this quilt by Jodi on Pleasant Home blog, I knew just what I wanted to make with my precious selvages. (In case you wonder, I try to add at least one inch of "color" when I cut off my selvage from the yardage.Some are less. Some are more.)
Because i figure that you might like to make some of these easy-to-do blocks, I thought that I'd show you how I'm making mine. First, dump out all of your selvages into a basket or other large container that you can rummage through.
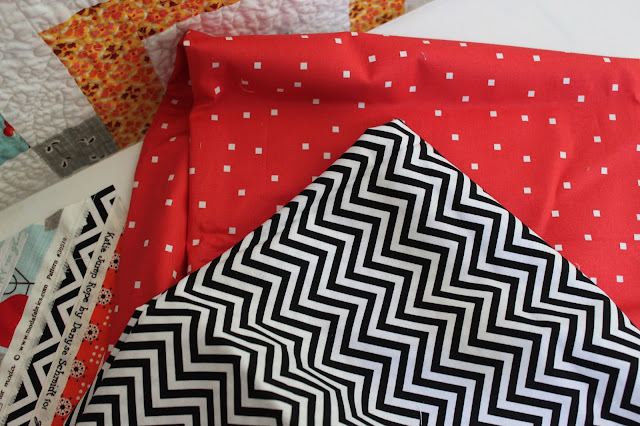
Pick a fabric to use for the center strip on each block. This fabric will create an on-point frame around each diamond shape once the blocks are set together. Cut the fabric into 1.5 inch strips. (A yard should be enough to make a lap size quilt.) I almost chose the red dot, but ended up using the black and white chevron below.
This is a foundation pieced block. I am using premium musiin, cut into 6.5 inch squares for the foundation. You could also use paper if you don't mind ripping it off after stitching. Center the one inch strip on the diagonal of a foundation. Cut the strip so that it extends over the end of the foundation square a bit. Pin if necessary. 
Now for the fun part: Pick out some selvage fabrics with the lots of writing or dots to lay next to the center strip.Cover the center strip on each side with the selvage leaving a half inch of the strip showing. Trim the selvage so that it extends past the muslin on each corner. I usually pin this first strip to keep it straight. Stitch close to the edge of the selvage. (You might want to stitch again on the other side of the writing if the selvage is one with a frayed edge.)
Continue to lay selvages on either side of the middle diagonal fabric strip and sewing as described above until the muslin is completely covered. Now,flip the block over and trim it to the muslin size using a rotary cutter and square ruler. (Note:Your foundation might have "shrunk" a bit from the stitching so be sure that you are cutting the block to the desired size. In my case, that is 6.5 inches.It is okay for the selvages to extend beyond the foundation base a little.)
Four blocks sewn together will create the X in the middle. Mine will measure 12 inches finished. I  plan to make 30 of these to create a quilt, 60" x 72". 
These things are incredibly addictive to make, I'm just telling  you now! Have I tempted you?!

Sunday, July 28, 2013

Sunday Morning

"As for you, O Lord, 
You will not restrain your mercy from me;
your steadfast love and your faithfulness
will ever preserve me!"
Psalm 40:11

Thursday, July 25, 2013

My Random July 365 Photo Challenge: Week 3

It's a bit of a hodge podge group of photos this week!

Starts with S: Why selvage, of course! I've been collecting for quite some time and finally started making blocks ...more later on that!

Dry: I love it when the hay bales start showing up in the fields this time of year!

A Boy: My grandson, Ezra, and his brother spent the week with us. I fixed zucchini one night. Do you think he was excited?

Ride: Maybe he was a bit more excited about this!

A Fountain: A wedding on Saturday evening found us on the Country Club Plaza in Kansas City, famous for it's beautiful fountains.

Shades of Blue: So many gorgeous colors to choose from!

Science: Okay, this one is a stretch, but you knew I would stick a Colorado picture in here somewhere! The 200 year old Ute Council Tree, down the road from my childhood home, requires a lot of attention to keep it alive and well.
Thanks for taking a look at my photos. I sure enjoy taking them! I'm linking with Cindy's Random Thursday posts again this week.
                                      

Wednesday, July 24, 2013

A Recipe for Adorable Baby Bibs

First, choose some cute fabrics from your scrap basket. Grab that old chenille bedspread hiding in your linen closet, too... it will make a great absorbent lining for the bibs.
You probably have a purchased bib that will work for a pattern. I like to use a paper bag to trace my pattern onto. Then, layer fabric and backing right sides together and cut out.
For my bibs, I didn't worry too much about using the straight of grain when cutting up the chenille, but instead paid attention to the pattern on the bedspread. I even put a little blue flower on one!
Next, sew around the layered fabric pieces leaving a small opening on one side to turn the bib through. Clip the curved area around the neck before turning and pressing. You might want to trim the seams to about 1/4inch wide if they seem too bulky.
 I top stitched close to the edge all around the bib to close the opening and neaten the outside of the bib. Attach a snap at the neck or use Velcro, as I did, to make the bibs reversible. 
 Now, go find a cute baby who needs some new bibs to keep her outfits dry and clean!
She will be the envy of all her friends in the nursery!
Enjoy!
I'm linking with Homemade Ginger today and the Ginger Jamboree. Check it out!

Monday, July 22, 2013

Snowballs for Ezra

When I recently borrowed some quilts I've gifted to my son and his family, I was happily reunited with a bright, cheerful snowball quilt that I'd almost forgotten about! Since I made the lap quilt before I began blogging, I've never featured it on Lollyquiltz. I thought that you might enjoy seeing it today!
 Made five years ago, to match my grandson's nursery, the colors were chosen to coordinate with the bright, large polka dot used in some of the blocks. From a distance those dots almost look pieced, don't they! I remember having a ball creating the border using strips inserted into the red fabric.
 The quilt is simply machine quilted with a meandering stitch found on my Bernina. The light-handed quilting makes for a cuddly quilt.
 Snowballs for Ezra was made to be used as a wallhanging for a baby boy's bedroom.But...  
oh my, how five years flies by for little boys!

Sunday, July 21, 2013

Sunday Morning


"Now faith is the confirmation of the things we hope for, 
being the proof of things we do not see
and the conviction of their reality,
perceiving as real fact
what is not revealed to the senses."
Hebrews 11:1 AMP

Friday, July 19, 2013

Red Cross Pillow

It's Friday and I have a finish to show you! There's little explanation needed---only that I used Quilter's Linen by Robert Kaufman for the background and various reds from my stash to make the liberated cross blocks. It was my first project using the linen/cotton fabric....LOVE it!


Have a great weekend!

Wednesday, July 17, 2013

My Random July 365 Photo Challenge: Week 2

Welcome to another week of snapshots from my photo-a-day challenge. I have so many fun vacation photos that I couldn't help by use a few for this week's prompts.

Shadows:A wooden bridge, in the mountains of Colorado, in late afternoon light.

 Seven:Lula's daddy made her a puppet theater for her birthday. Seven of her dozen new puppets are checking it out!

 An Ordinary Moment: Things I use every day. (Isn't it ordinary to have a cell phone case that matches your blog header! LOL)

 Urban Art:In a small Colorado town, this is as urban as it gets!

 On the Street: For some reason, I just love doors! How fun to see them standing open rather than closed tight!

 A Framework: Now, here's a tree house any kid would want!

 Candid: A black and white photo helps you focus on the moment, and in this case, Lula's happiness at getting new pair of sunglasses!
Once again, thank you for taking a moment to see the little moments that make up "life" for me! See you tomorrow.

Tuesday, July 16, 2013

Popsicles

There's nothing better on a hot summer day than an icy cold treat...
...unless it's a new quilt in happy popsicle colors! 
It's so refreshing, don't you think?   
Blue raspberry, lime or orange creamsicle... what's your favorite flavor?
I don't know about you, but I like to eat my popsicle under a nice shade tree so that it doesn't melt too fast.
That's especially important after a long bike ride!
Ahhhhh....summertime...
...and the livin' is easy!