Showing posts with label machine quilting. Show all posts

Thursday, June 12, 2014

Where I Quilt

Since posting photos of my quilting set up, there have been several  questions about my frame and machine. Today, I'll show you a few more pictures and do a little before and after reveal of my quilting space.
 Some of you commented that you've never seen anything like my frame. Well, frankly, that's probably because of it's age! LOL. I purchased my wooden frame about 10 years ago when I was blown away after seeing a domestic machine mounted on a movable carriage that would turn it into a 'short' long-arm! It was revolutionary to my thinking and affordable!
 Since then, the Grace Frame Co. has come out with much nicer steel frames. I'd dearly love to have one. I'd also love to have a machine with a longer harp. They were not available when I purchased my Juki TL 98E on ebay. I love my machine though and would use it for piecing if I upgrade.
 As you can probably see, the quilt backing and top are rolled onto the three aluminum bars much like a long arm set up. I can quilt from the back or the front of the machine by moving the wooden handles that then move the platform which moves the sewing machine. It's simple. It works. And, I've finished many quilts that would probably still be just tops if I hadn't purchased this frame and machine. I call my style of quilting utilitarian, anyway.
 I used to dread going to the basement to use the machine, though. Here's a "before" photo below....and this is actually halfway through the basement project: after my husband put up some walls.
 Below is an "after" photo taken from the same angle. You can see that we painted the floor and paneling and hung some fun light fixtures. We also paneled the end of the room with boards taken off of wooden pallets. That alcove area is our new "video game area. My husband wants a big screen TV there. I want to up grade my quilting frame. Hmmm.... 
 One of my favorite parts of my end of the room is this wall. The two windows were taken out of a house we used to live in. I painted the back of the large one with chalkboard paint for my grandchildren to draw on. Can you see the cat door on the bottom of that window? We tell the kids that behind the blue door is Marble's bedroom! (Ezra thinks we should paint the door!...he has no idea that I purchased the door because it looks like that!)
 I still have some decorating to do...pictures and quilts to hang, etc. Hubby still has a bit of trim to nail up. I might set up a sewing center in the alcove to the left of that double door. I plan to paint the pool table some shade of blue/green to blend in with the floor.
At first, I wasn't too excited about that pool table so close to my quilting frame, but when I get bored quilting and need a break, I might just brush up on my skills and beat him one of these days!
Have a sunshine filled weekend! I hope you get to sew!!

Tuesday, August 30, 2011

Plaid Quilting

I made up a new quilting design! At least it's new to me, so it feels like I thought it up myself....I call it  'Plaid Quilting'. Straightish lines congregated together in sections both horizontally and vertically....easy peasy!
 The quilting is a little harder to see on the front of the quilt, but I like the youthfulness of it with the fabric in the middle of this design.
Another binding to sew down and then you can see the whole schmoe! 
I named the quilt "Fun in the Sun". We've had lots of that this summer!!
Good bye, August!


Saturday, June 19, 2010

Charm Pack Quilt

I love a great charm pack, don't you? At usually around $8 each, they are a cheap thrill for me to indulge in some material obsession , get the entire designer's line, and start a quilt project with some of the cutting already done! There are whole quilt books dedicated to clever ways to use the 5 inch squares. In Megan's simple quilt, the charms get the attention they deserve, surrounded by 2 inch strips in a "Square in a Square" pattern. There are so many fun ways that "Square in a Square" can be interpreted making it an easy quilt for the beginning quilter and a way for the expert to have a quick design challenge as well.
Last night, I finished up the binding on both of these quilts destined for  New Hope Homes.
I do love, love, love a stripy binding.  Megan's quilt is bound in an Amy Butler stripe I've had in my stash for a while.  The pink and black quilt is bound in a fun Brother and Sister stripe that I found at Hobby Lobby.  I like the way that the lime and grey in the stripe accent all the pink and black loveliness.
Have you tried pre-wound bobbins? I love them for machine quilting. You know how much thread it takes up and these pre-wound babies help relieve the annoying need to change out the bobbin so often. I was running low on my favorite brand (Admiral) and so gave these MasterPiece bobbins a try.  The sales clerk at a LQS told me that these were the cream of the crop and I went home so excited. Maybe it's just my machine, but I've never had bobbin thread shred until using these: Big disappointment. I think I will try to return the rest of the 20 bobbins I purchased. If you use pre-wound bobbins, I'd love to hear about your favorite brand.


I decided to change it up a bit yesterday  and catch up on my virtual sewing bee blocks  instead of working entirely on donation quilts. Kelly sent some fabric scraps and invited us to add in some of our own to make these 10.5 inch blocks plus a siggy block. Here's her inspiration. I may have to try one of these myself using Leaders/Enders sometime.
Last, but not least, while shopping for the bobbins I couldn't resist this cutie pie.  I'm such a sucker for birds! I'm envisioning a little summer sundress for one of my granddaughters, with scraps left over for.......whatever!!
*edited in embarrassment because due to "operator error" the real reason that the MasterPiece bobbins were such a disappointment is all my own fault!  I got to thinking about it and decided that maybe I should try just putting the entire bobbin with the cardboard sides and all into the bobbin case to see what happened.  Voila! It worked like a charm!  With the other bobbins, I have been removing the cardboard sides for the best tension. Okay, maybe these really are the "cream of the crop"!  I stand corrected.

Wednesday, June 16, 2010

The Next Generation

When my daughter, Megan, was a little girl we sometimes did sewing projects together. She was quick to learn to use the sewing machine, actually pushing the foot pedal to the floor.  Her normal speed was "fast"! At eleven, Megan made her first quilt, picking out Amish colored solids to fashion a simple nine patch.  The second quilt came a good ten years later, in college......a plaid flannel rag quilt. Now a mommy, expecting her second child in a few months, Megan is proving herself to be "her mother's daughter"....the next generation of quilter. Megan has designed and pieced a twin quilt for little Lula to use when she moves to a "big girl" bed. Yesterday, guess who was learning to machine quilt?
I use a Juki machine on a Grace quilting frame to quilt most of my quilts.  Today Megan practiced on one of the Rwanda Quilts (which she also pieced). She still loves to put the pedal to the floor (or hand, in this case)!
The "cursive e" design is something Megan thought of and I think it is a wonderful first pattern for machine quilting.  It was smooth and easy and really cute when finished. I'll have to add this to my list of overall quilting designs. 
I love having my daughter as my quilting buddy!  It makes me really happy!!  Great job, Meg!

Wednesday, May 26, 2010

Late Nights

Do you ever have nights when you can't sleep so you think, "I might as well get up and do something constructive!"? If you can empathize, then welcome to my world till 3 a.m. the last two nights.  I didn't drink too much caffeine and it wasn't hot flashes, although sometimes those are the sources of my insomnia.
  No, this time my sleeplessness has been brought on by mind boggling, raw sadness for one of my best friend's loss of a four year old grandson in a tragic death. The words are hard to even form, but just in case it could save another child's life, I will tell you.  He died from suffocation when his head was caught between the mattress and the safety rail on a wooden bunk bed. So, please, if you, or anyone you know, have children that sleep on the top bunk, be certain that there is no way for their little body to fall between the mattress and the rail while they are sleeping.
  I can't sleep because my mind won't stop. So, I get up and sew......and pray.
Here's what I've been working on:
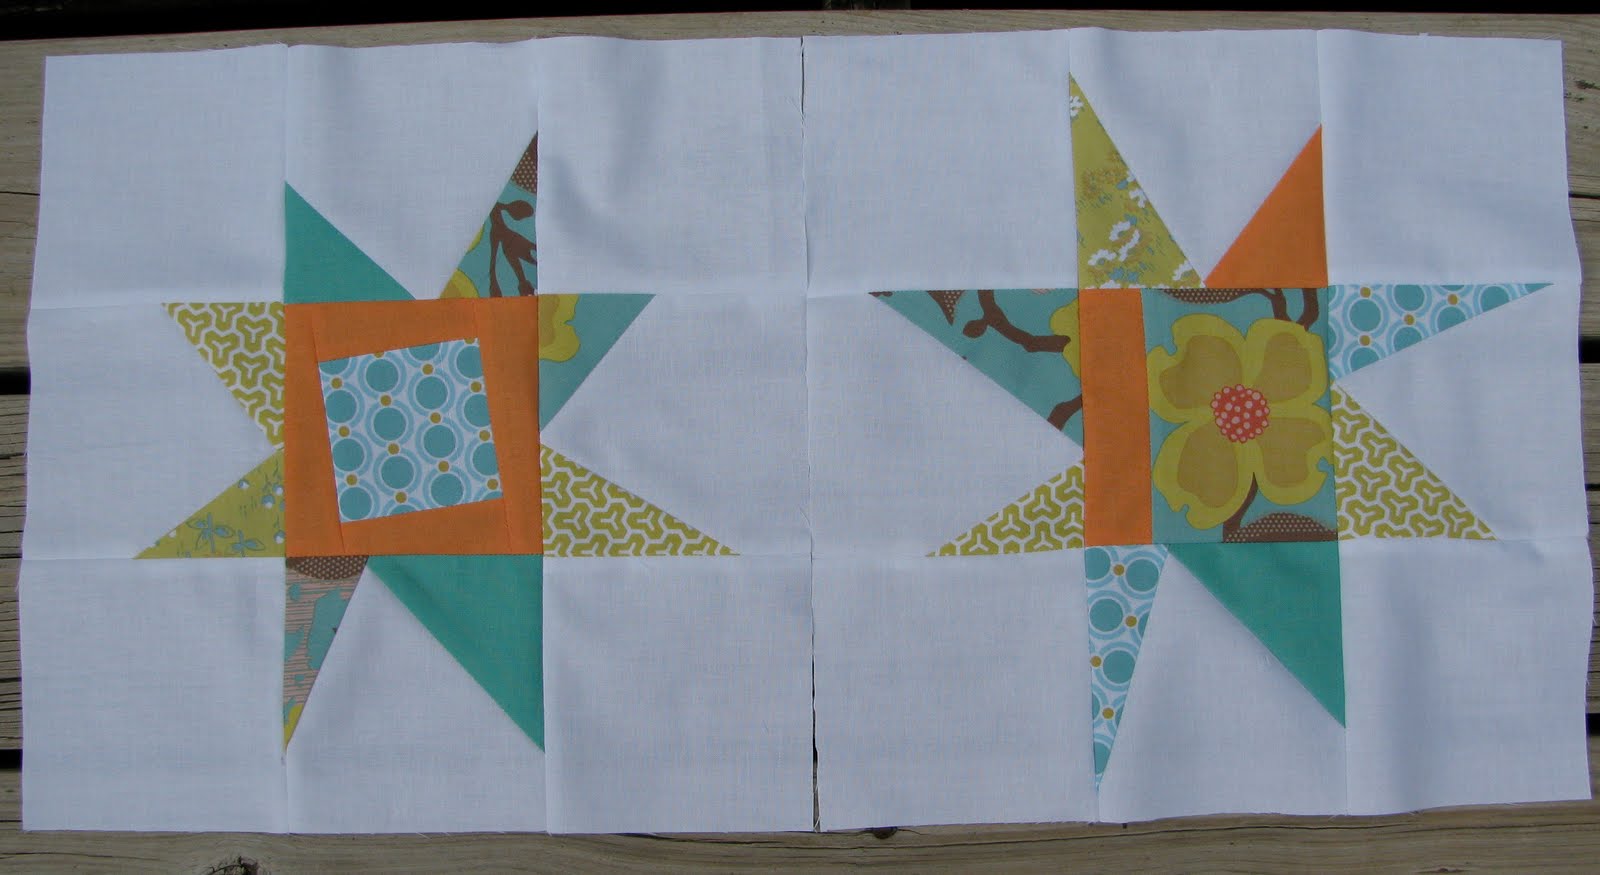
First, I made blocks for Shaina and will just barely get them in the mail to meet the May 31 deadline in the Nittany Block Party.  Shaina wanted liberated stars in fabrics she provided. I loved working with the aqua and orange color scheme. What a fun quilt this will make.


You probably thought that I had forgotten about the special project that I was working on last week for a very special person.  Nope, didn't forget.  I just had to put it aside to do fun things like empty sodden boxes in my basement; plant flowers that have been waiting for two weeks in their little plastic containers while the rain poured down; have a sleep over for my grandsons; and recover from a 24-hour bug.  But now, I  finally got back to my brown and pink project. The late night sewing marathon got me all caught up.


I decided to quilt the wall hanging on my Bernina, so I had to get the layers all put together after I finally got the borders added.  This step in the quilt-making process is not my favorite, but I have found that if I am diligent about stretching out the backing on a table or floor and taping it down so it is very square and tight, it makes for a quilt without any puckers in the finished product.
(If the quilt is larger than my table, I pin it to my carpet with straight pins since I don't have a large wooden or tiled floor to tape to.)  Carpeting works just as well, but is kind of hard on the pins....and my knees! I then layer on the batting and smooth it out.  Finally, I smooth, smooth, smooth the quilt onto the batting and start in safety pinning the three layers together. When I'm done pinning, I remove the tape and am ready to quilt.


My late night quilting was soothing and healing as I stitched and prayed for my friends to find hope and healing in the days ahead.


I added more quilting detail than I had originally planned...but like the way it turned out.  Here's some of the view from the back. *Note: lighting at 3 a.m. is not great for picture taking! The only thing left to do is add the binding.............................
I got that accomplished this afternoon, so I'm ready to put up my feet, drink some decaf tea and watch the season finale of CSI New York as I hand stitch the binding to the back.
Tomorrow I'll show you the front and let you in on who gets this special quilt.

Are any of you awake in the middle of the night?  What do you do instead of "just laying there?" Surely, I'll sleep tonight.

Sunday, March 21, 2010

Celebrating!

What did you do to celebrate National Quilting Day?

As a good citizen of the Quilting Community, I spent part of my day celebrating!  Here is a great picture of all the quilters out there rushing to their LQS to do their part--buy fabric!!  Actually, it is picture of the fabric I bought yesterday, but not from my fav quilt shop. Nope.  It's from Target.  And it's Liberty of London fabric.  Yup. In the form of an XL size pair of boxers!  I got the idea from Mrs. Schmenkman. I have my rotary cutter ready to cut into this cute fabric.  I have my eye on another pair with a pretty  blue and white print, but thought I would try one pair first to see how easy it was to cut up.  There were also some men's shirts and children's dresses with nice prints that would look great in quilts. Thanks, Target.  I'll be back. Maybe.


But adding to the stash can't be really counted as quilting so I spent several hours REALLY celebrating in my basement!! Sometimes, it seems kind of creepy down there, but once I get the lights all on and a quilt loaded onto my Grace quilting frame, I'm in heaven.  My TL98E Juki was purchased on ebay about six years ago and I love her. She isn't fancy but adding Juki and Grace to my quilting family really changed how many quilts I can make.  It took a little over two hours from start to finish to quilt this lap size quilt.  I sewed the binding on and got part of the hand stitching done while I watched KU lose and K State win last night... It was an all around day to celebrate!!