Saturday, January 29, 2011

A Blanket for Frosty

 My little sweeties and I were finally able to get Frosty to visit yesterday.  Until then, the snow just wouldn't pack together enough to form a snowball. With temperatures reaching 50+, it was now or never!
Today, when I checked, Frosty was fading fast.  I had to search for his nose and never did find those pebble eyes. One arm had fallen off already.  I felt so sorry for Frosty that I decided he could use a little cheering up! A cozy blanket.... that's what he needed!  I had just the thing....fresh off the sewing machine and needing a place to land!!

Yes, I finally got my Innocent Crush quilt top together. I don't know why I had so much trouble finishing this cute Serendipity pattern.....it wasn't difficult or anything....I just had to force myself to keep going back and sewing on it...a little here and a little there.  Do you every have a quilt effect you like that?  I may add a little khaki border...still deciding about that. Oh ya, there's the quilting to do, as well. But still..........!
I think Frosty really felt happy modeling Serendipity and if he can just hang on another 24 hours, I hear another snowstorm will arrive and he'll be able to stay and visit a while longer!
I know that would make somebody happy!

Monday, January 24, 2011

Just Playing

Just playing for 15 minutes (or so!) before I begin on the REAL sewing for the day has gained me this so far.............
 It's been so much fun, that it truly is like play. It might even become a habit.  We'll see. How long does it take for that to happen? Anyhoo, I've been playing around with ideas of how to set the blocks together, too. Thank you, Kleenex, for the inspiration!
 These helter-skelter blocks have lots of seams.  Sometimes, I press to the side....other times I press the seams open...it just depends on the "seam situation". But, regardless, this little spray bottle of Best Press has become my best friend. It was on sale at Hancock's one day and I decided to give it at try, after hearing so many rave about it's virtues. 
Well, I'm here to join the band wagon of singing the praises of this product...and it smells good, too. All those seams are under control and lying flat, just the way I like them...no flakes or stiffness. It's incredible, really! 
I see that you can buy refill bottles....better get some.... I know, I'll need lots more!
Wonder what scent I should try next?

Friday, January 21, 2011

My Baby Quilts

Brrrr...... Baby, it's cold outside! The baby quilts are getting quite a workout at my house when the little girls come to visit. Just in case you'd like to see them...............
 This first one has been around since 2001. It's a Crazy Nine Patch that I made when teaching a class for Harper's Quilt Shop that year. It's a favorite for laying on the bed when a sleepy newborn needs a place to nap.
 The bright colors attract the attention of little ones during tummy time so it often is laying on the floor with toys and a baby on board!
 When colder weather merits a quilt to snuggle with in the crib, this Yellow Brick Road quilt is the one I turn to. The quilt was put together in 2006 and the more I wash it, the more snugly it gets!
 Isn't the Dick and Jane fabric just perfect coupled with the cute 30's reproductions?


 The back features Dick and Jane playing in the summer, making it a sort of reversible quilt. The Dick and Jane print always reminds me of my childhood and learning to read.
The addition to my latest baby quilt collection, the Disappearing Nine Patch I'm calling Happy Daisy, will get lots of love too, I'm certain!

In other news, I was pleased to be nominated this week for two awards by other bloggers!
First, both Jackie and Jodi of Sisters in Stitches awarded me the Stylish Blogger Award. 
Being a bit uncertain as to how this award originated, I'm a little suspicious that perhaps it may not really be meant for a blog about quilting, even though I do think that the bird on my header is pretty cute! I'm asked to pass the award on to 8 other blogs, but being a bit rebellious, I am going to l limit it to only two that I think really are stylish......
and
Another part of the award is to pass on to you, 8 things about me that you might not know.
So....since this is a blog about my love of quilting, here are 8 color combos that I would love to include in a quilt sometime:
1. red/robin's egg blue/pink/white 2. grey/ yellow/white 3.orange/turquoise/white 
4. grey/aqua/ white 5. brown/light blue/white 6. brown/purple/white 7.pink/orange/white
8. green/turquoise/white
(I'm a bit enamoured with white, huh?!)
Cindy at Rose Room Quilts also nominated me for the Liebster Award, which is given to blogs with less than 300 followers, but are an interesting read.  The recipient is then asked to pass it on to 3 other blogs to help spread the word about great reads.
My nominations are Teaginny Designs,  a blog by a fellow Kansas Citian with incredible talent, Andie Johnson Sews who is always sewing up something cute, and Elizabeth's blog Don't Call Me Betsy who is just starting her first quilt-along.
I hope you will pay these great blogs a much deserved visit!

Tuesday, January 18, 2011

Beezy

I've been beezy sewing up some blocks for my Bee pals.......................
 Here's the January house block for Calendar of Houses Bee. Terrie in California gets this one. She says it snows in her neck of the woods of CA, so hopefully this is still appropriate.
(The block doesn't look very square, but in person, it really is....I swear!) I decided to add the tree and bird after I had the block all finished. I should have realized that it would need a little color in that corner.... Better plan ahead better next time to avoid pulling out so much hair! Argh!!
 The One Block Over Bee is a new one for me this year. First up is Michele in SC who sent us these pretty Meadowsweet fabrics and asked for 14 inch wonky log cabins. She's also requested that the solid lime and aqua fabrics be present in each block. It was lovely to get to work with springtime colors!
My little batch of Kleenex Box play is growing.  I'm beginning to think about how I might set them together.  Thank you Victoria for your  inspiration of playing with fabric for 15 minutes each day! (My 15 minutes usually gets multiplied, I'm just sayin'!)

Sunday, January 16, 2011

Doll Quilt Swap


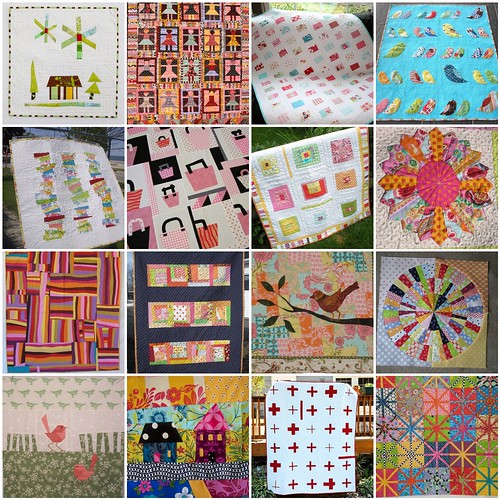
Have you seen all those darling little doll quilts on flickr? I have admired them from afar, waiting till the next swap opened up so I might enter and play. Woo Hoo!  Over the weekend I learned that I was chosen as one of the fortunate swappers and was given the name of my partner.  I've already started stalking her to learn just what type of little quilt would maker HER smile. It will be hard to keep it a secret for the next few months! Perhaps the quilter who was given my name is reading this post to try to learn something about my favorite styles.  Here's the mosaic I put together to give my partner some ideas of quilts that make ME smile!
Doll Quilt Inspiration Mosaic

Friday, January 14, 2011

Three Secrets to Making Free Quilts

*To begin the new year with one of my favorite quilting hints, I'm republishing this post from last spring for anyone who needs a refresher or has not heard about using leader/enders to make Free Quilts. 


FREE!  What word grabs your attention more than that one!  What if I told you that I often make Free Quilts? Yep, it's true. They don't cost me extra money OR time.  Wanna see one?
Here you go........................

I just finished sewing the blocks together on this one and am getting the backing and binding ready so that I can get it finished up.  This little Green Zebra is my latest creation for the orphanage in Rwanda.  Friday, my friend ,Susan ,and I spent a happy day chatting and sewing  for our 30 little friends in Africa. My quilt cost me nothing.  If you would like, I'll be glad to share my Three Secrets to Making Free Quilts. Listen closely!

SECRET #1: Save your scraps.  Don't throw them out.  When you finish making that gorgeous quilt for which you happily shopped for the perfect fabric, take a few minutes to cut the scraps into squares and strips.  I generally cut both 2" and 2.5" squares and throw them into containers for each.  I also cut 3 sizes of strips from the leftovers and save them in plastic containers.  The sizes I cut are 1.5", 2", and 2.5". These fabrics are the main ingredients for your free quilts.

Once you catch the habit of cutting up and organizing your scraps you will realize how easy it is to use them to quickly piece some fun scrappy quilts.                       


There is no magic to my strip and square sizes.  They just seem to work for me, but you could cut up smaller or larger pieces.


SECRET #2: Use chain piecing when you sew patches and blocks together when making a quilt.  Chain piecing involves feeding the fabric pieces one after the other while sewing, without raising the pressure foot.  This technique saves time and thread plus prevents that irritating glob of thread that sometimes forms when you first start sewing two pieces of fabric together. (You know what I mean, I know you do!)


You can make your "chain" as long or short as you want. After chaining the pieces together it is easy snip them apart with scissors.  I sometimes take the whole chain to the ironing board and press the seams before cutting them apart.


SECRET #3: I saved the best for last.  This one is worth it's weight in gold and is the key to making the Free Quilts without adding any extra time.  If you use this secret, you can make one or more extra quilts every year without adding any more sewing time. I am currently working on my 3rd Free Quilt this year and it is only the first week of May!
Are you still reading?.....Here it is: Use leaders and enders when you quilt.  Always.
Always. Always.

I used to just sew across scraps of fabric over and over until they were thick with thread and then throw them away and start over with another scrap.  Then Bonnie Hunter from Quiltville suggested actually sewing 2 pieces of fabric together as a leader/ender and using those pieces to later make another quilt.  I decided to try it and that's how I got started cutting up my scraps.  Using leaders and enders is like continuously chain piecing.  There is aways (well, almost always) fabric left under my pressure foot like the picture above.


An "ender" is simply fabric that you sew over at the end of each chain. The needle stays in the fabric ender and the blocks behind it are snipped off and used.  The ender then becomes a "leader" as you begin sewing together the next series of blocks or whatever you are sewing. At the end of the chain you would again sew over an "ender" and leave it under the pressure foot. This technique is repeated over and over as you make a quilt.
Leader/Enders can be whole blocks you are creating, if you want.


Eventually, you will have a pile of blocks sewn together like this.  You could sew them together to make 4-patches or add another square to each and make 3 in a line to be sewn into 9-patch blocks.  My current leader/ender project involves using rectangles as the leader/ender to make coins for a coin quilt.  Essentially, I am always making two quilts at once.  I don't feel that it adds any extra time because I would be using a leader/ender anyway instead of always having to trim away the thread ends if I only sewed one block at a time.  Here are some of the blocks I have made using this technique.


As you can see, I often sort through my squares and am intentional about which ones I use for leaders and enders.  If I need more squares in a certain color range, I dig into those strips from Secret #1.


Fabric is expensive. I'm addicted to it, as I've admitted before, so I want to use it wisely.
By utilizing these Secrets, I am able to create fun, colorful quilts to bless others and to satisfy my love of creating.

With a little advance planning you, too, will be ready with blocks to create a gift for the neighbor who just had a baby or perhaps a cuddly quilt for a child on the other side of the world who need to know that someone, somewhere cares. Give it a try! You're gonna love it, I promise!

If you decide to join me in making some Free Quilts, send me a picture of your project.  I'd love to see it!  I leave you with one last picture of one of my favorite Leader/Ender Free Quilts.
It's called Color Box

Doesn't it just make you smile?!

Free Quilt Progress

If you have followed Lollyquiltz for awhile, you know that I am always sewing two quilts at once, using leader/enders in an intentional way to create another quilt besides the one I'm currently sewing together.  Since I haven't talked about it for awhile, I thought the new year would be a good time to do an update on the Free Quilt I'm currently working on. 
 Usually, my Free Quilts have been  lap size projects, many of them donated to Rwanda. This time I am tackling something more courageous. I'm putting together a bed size postage stamp quilt using two inch squares of scraps and Kona white.
 Since last summer I have been creating these four patch blocks, a little here and a little there. That's how Free Quilts come about....slowly, but with little effort. First I sewed a white and a print together till I had a bunch.  Then those were paired to make the four patches you see here. Every so often, I have to replenish my stash of squares to keep going.
 To make it easier to keep track of how many blocks I have, I like to pin the finished ones together into groups of ten. I figure I need 638 four-patches to make a twin quilt. Doing the math, you realize that's 2552 total squares......whew!
Once my pile gets really large, I store them in plastic bags, with the number written on the outside so that I don't have to keep counting them over and over. Today, I pressed another batch and now have over 500 made. Yay!  I'm seeing the light at the end of the tunnel. The next step will be to sew these together into 16-patch blocks (still using them as leader/enders). Once that is done, I'll assemble my blocks into a bed quilt just as I would any  other project, and begin yet another leader/ender project.  I have plenty of time to decide on that, I think!! 
In case, any of you weren't reading when I originally posted about how to make Free Quilts, I think I will republish that  post. Try it in 2011. I think you'll love it!!

Tuesday, January 11, 2011

#1 on 1-11-11

Yeah!  I got my 1st quilt top for the year together just in time for 1-11-11! Something to cheer about, I think!
 Jennifer hosted a quilt-a-long back in the fall with simple lines and simple fabrics....a charm pack and two contrasting solids.  I used Kona snow and taupe plus a Moda Boutique charm pack. The blocks  were finished by Thanksgiving and then put away until yesterday.  
 It all went together very quickly. In the end, I chose to add a border of Kona snow to make it a tad larger and plan to use a colorful binding to carry out the color in the squares. Hopefully, I have something in my stash that will work!
I'm tickled pink to get this cute top together and will quilt it soon because I plan to gift it to someone special who is having a very special birthday in the spring. 
  Did you finish up any project to celebrate 1-11-11?

Monday, January 10, 2011

Birthday Party Dress Pattern Review

Last fall, I purchased this Oliver + S pattern and some cute corduroy by Valerie Wells. After cutting it out, I left it languishing in my sewing room until last week.  Wanting to finish up some WIP with this new year, this cute dress was at the top of my list!

Since my two year old grand daughter decided not to cooperate in modeling, here's the result on a not-as-cute-as-her hanger.
 I am partial to little dresses that button up the back....I think it looks so much more charming than a zipper (and is easier to slip onto a moving target). The buttons I used are vintage ones that I found in my button tin. (Please excuse the wrinkles....oops!)
If you have been seeing these children's patterns in your LQS, and have been wondering about them, I thought I might give you some feedback with my experience. First of all, as you can see in the upper right hand corner of the picture above, the patterns are rated as to difficulty in sewing.  This one is rated 3 scissors, which I would agree is accurate.  Having quite a bit of dressmaking experience, I found the pattern certainly not easy, but not extremely hard either.  After making one dress off the pattern now, any others will go quite smoothly. You also see that the cost of the pattern is not cheap.  However, there are four sizes included (I made the size 2T and it seems very accurate with Lula's ready made size.) and the design features are outstanding...more like what you would find in an upscale children's shop. I'm showing you the inside of the dress, so that you can see a few of the features.
As you can see, the facings are generous and the little box pleats are stitched down. The hem is faced, which was a lovely designer touch. (You just need to be sure to shorten or lengthen the pattern, if necessary, before cutting out the pattern.) All the instructions were superb and well written with good illustrations and hints. There was a glossary of terms with instructions, which would be very helpful for anyone new to dressmaking. The only addition I made to the pattern was to staystitch the facings for a flatter appearance.
As you can imagine, the box pleats were the most time consuming part.  But, with great instructions, I think just about anyone with a little experience could accomplish them if the markings are transferred from the pattern onto the fabric properly before beginning. (I should have paid better attention to that detail myself!) 
I give this pattern an "A" for sure! I already am thinking of other fabric options and with several sizes included, will get my money's worth. I'm headed over to the Birthday Party Dress Flickr site now, for some ideas!